
Solving strategy
New to Enigmic? Start with the six core rules and the object glossary before diving into advanced patterns.
The rules fit on one screen; the skill is in the order you apply them. These are the techniques that solve most cases, roughly in the order you should reach for them.
Built on the official rules: every technique below follows from the six rules on the How to play page — one suspect per row and column, rooms matter, “beside” is never diagonal, blocking objects, one exact solution, and the killer shares a room with the victim.
Technique 1
Keep blocked cells in mind early on
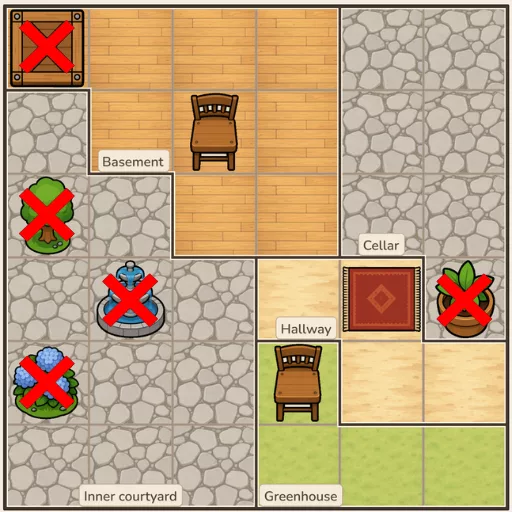
Before reading a single clue, take a look at the board. Cells containing large objects (like plants, water coolers, crates, or rocks) are already blocked by the game itself – nobody can stand there.
The game won’t let you manually place a cross on these objects (it will show a red error outline), so simply treat them as automatically eliminated in your mind. This immediately narrows down the viable options in their respective rows and columns.
Not sure if an object blocks the path? Check the object glossary – chairs, sofas, carpets, and beds can be occupied by characters; solid scenery can’t.
Technique 2
Finding Unique Landmarks
Start with clues that point to a unique object or a specific room combination.
- A clue like “He was near the fountain” is instantly solved if there is only one fountain on the board. Placing these definitive targets first is crucial, as each correct placement eliminates an entire row and column for all other players.
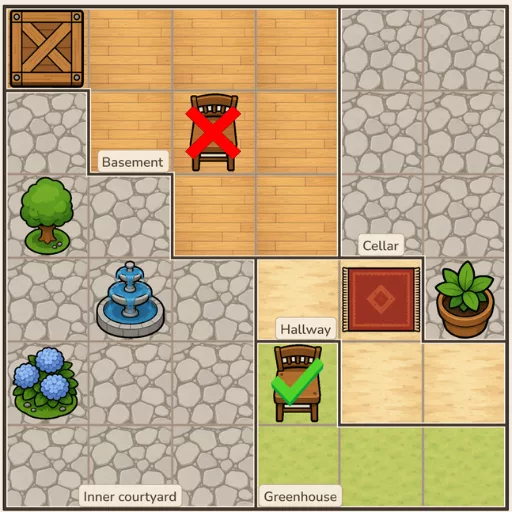
- If an object appears more than once on the board, check if the clue names or implies a specific location. For example, if you have the clues “She was in the Greenhouse” and “She was on a chair,” look closely at the grid divisions. While there is a full chair inside the Basement, the second chair sits directly on the border line of the Greenhouse and Hallway. Since the Basement chair is completely ruled out, the suspect must be placed on the chair interacting with the Greenhouse tile.
Technique 3
Using Row and Column Clues
Turn row and column clues into elimination grids.
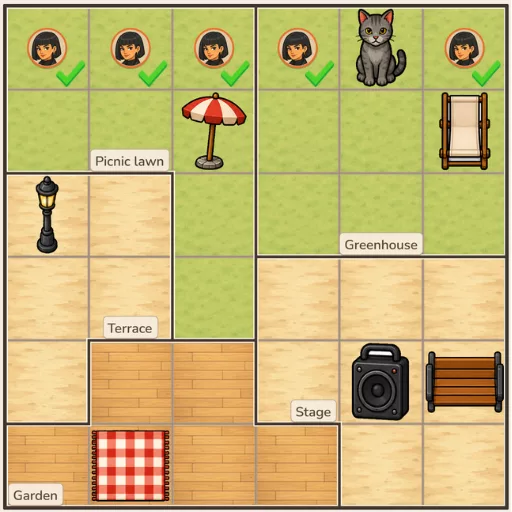
A broad clue like “She was in the top row” doesn’t pinpoint an exact location immediately, but it provides two critical tactical advantages:
- It instantly rules this specific suspect out of every other row on the board (such as the Terrace, Stage, or Garden areas). You can safely clear her from all lower tiles.
- Since only one suspect can occupy a single row/column according to the core rules, her presence in the top row means that whichever specific cell she eventually claims is locked. No other character can be placed in that same horizontal line.
How to play it
Mark the entire target row with temporary notes for her name, clear her from the rest of the board, and move to the next clue to find the intersecting column.
Technique 4
The Last Free Cell Principle
Look for the last available cell in a row or column.
While this technique requires a few initial moves to set up, it becomes your most powerful tool as the game progresses.
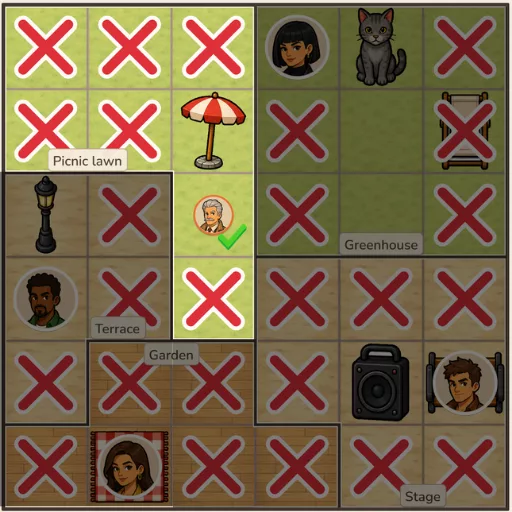
- Every row and column must contain exactly one suspect.
- If a row has all its cells crossed out except for one (due to walls, blocked objects, or other suspects being placed), that last remaining cell must be occupied—even if you don’t know who goes there yet. Once you identify that mandatory cell, you can look at your remaining character cards to see who fits.
- This works backwards too. When you have only one suspect left to place, they must go into the only row and column that remains completely empty. You can solve their position instantly without even reading their specific clue.
Example: This deductive method is exactly how Henry is placed in He was in Picnic lawn walkthrough.
Technique 5
Eliminating Options with Negative Clues
Use negative clues to systematically shrink the puzzle grid.
Negative clues like “She was not in the corner” or “He was not in the Deli counter” rarely pinpoint an exact location on their own. Instead, their primary job is to slash the number of available options.
- Check negative clues immediately after you process your positive ones to clear out dead ends.
- Pay close attention to definitions. A “corner of the room” refers to the corners of that specific indoor area on the map, not the four corners of the entire game board
- In this game, terms like “beside,” “next to,” or “adjacent” follow a strict rule. They mean directly above, below, left, or right. Diagonal spaces do not count. A diagonal neighbor never satisfies a “beside” clue—and crucially, it never violates a “not beside” restriction either.
Case Study
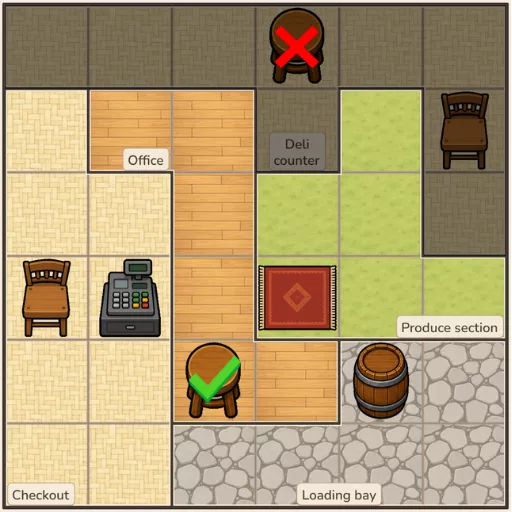
Look at James’s clues: “He was not in the Deli counter. He was on a stool.”
There are two round stools on the board. However, since one of them is located inside the Deli counter zone, that option is instantly eliminated. James must be placed on the second stool located on the Office.
Technique 6
Identifying the Killer
Work backward from the victim’s location.
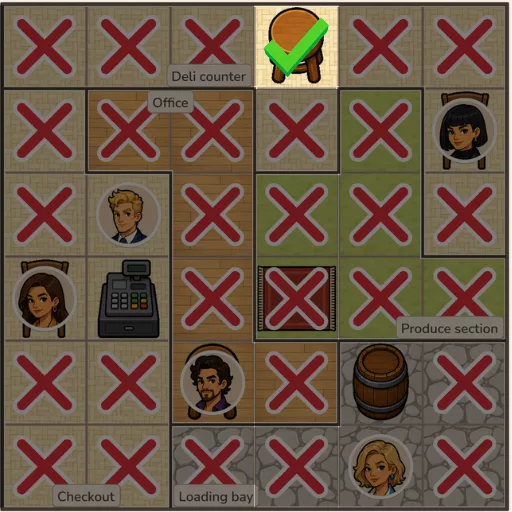
The ultimate goal of the game is to find the killer, who is always the suspect sharing the exact same room with the victim.
- Once you successfully pinpoint the victim’s room, look at your remaining suspect cards and ask: “Who else can still legally fit into this room?” If all other candidates are ruled out by rows, columns, or objects, the last remaining suspect in that room is your killer.
- Never formally name the killer until every single suspect is placed on the board. A character might look like the perfect and only fit early in the game, but a later row or column resolution could easily push them out into another area.
How to play it: Use this mechanic as a guiding light throughout the game, but execute it only as your final, definitive move.
Technique 7
Note Generously, Place Reluctantly
Mark the grid freely, commit carefully, and use hints only as a last resort.
Success in this game depends entirely on your discipline. One wrong guess early on can ruin the whole puzzle.
- Use elimination marks as much as you want. Once a cell or row is logically ruled out, cross it off immediately. It costs nothing, you have an infinite supply, and it instantly clears your vision.
- Never place a suspect on the board based on a hunch. Only lock a character into a cell when a specific clue or the Last Free Cell rule absolutely forces it. Most “unsolvable” board states are just the result of a single early guess.
- In-game hints are strictly limited and will automatically place the first available unplaced suspect for you. Since you cannot choose which character gets revealed, do not waste hints early on. Save them only for moments when you are genuinely stuck and cannot find any more logical steps on your own.
A solving order that works
- Cross out every blocked cell.
- Place suspects whose clue points at a unique object.
- Cross out their rows and columns for everyone else.
- Apply row, column, and room clues as notes.
- Apply negative clues to remove cells.
- Scan every row and column for a last free cell; repeat from step 3 after each placement.
- With the board full, name whoever shares the victim’s room.
See it on a real case
The solved walkthroughs apply these techniques clue by clue.